The Swinger is a little Python app that time-stretches an existing recording, adding shuffle to its rhythm. With examples: “Money for Nothing” and “Enter Sandman” are particularly awesome with a swing beat.
Comments Off on
The Swinger is a little Python app that time-stretches an existing recording, adding shuffle to its rhythm. With examples: “Money for Nothing” and “Enter Sandman” are particularly awesome with a swing beat.
While browsing through Value Village’s collection of wall-warts looking for another 9V power supply, I happened to spot a Palm Portable Keyboard with a $5 sticker. Having randomly run across a description of the interface pins a few days before, I wasted no time snapping it up. It’s a great little unit: a full-size QWERTY layout, plus arrow keys and a handful of special-purpose function keys, and it folds up Transformer-style into its own little 3 1/2″ x 5″ carrying case. Now, what to do with it?
I’ve decided to run a little workshop evening for the LED lanterns. I’ll describe the circuit, explain how to extend it for other projects, then show how to assemble the device. We’ll build a few of them; I’m not sure how many we’ll make but I am guessing each person will be able to build a couple. This will be held on June 2nd. Location to be determined based on the number of responses. Let me know if you are interested in attending.
Instructable: how to assemble your own Arduino-compatible microcontroller board. It’s generally worth it to me to spend an extra $11 on one of Sparkfun’s Arduino Pro boards, but this is a really well laid out tutorial, and maybe I’ll want to build a whole lot of really cheap microcontroller-driven devices some day….
How to make round bacon, using a scary-sounding substance called transglutaminase, aka “meat glue.” With pictures.
More percussion circuits: these are nice and simple, and it looks like they will run on 9V, too.
Instructable about converting an ’82 Yamaha to run on electric power. 70 mph, 15-20 mile range, six moving parts including wheels.
Have I posted this before? From Roland’s ‘The Synthesizer’, Practical Synthesis for Electronic Music v2, Chapter 3: Rhythm and effects. It is a series of block diagrams for synthesis of standard percussion sounds using modular synthesizers.
Another interesting reference, albeit brief, is the block diagram for the Mungo dDS drum synthesizer. Clavia’s Nord Modular book has a chapter on percussion synthesis, with discussion that reminds me of the comprehensive Sound-on-Sound series [1, 2, 3, 4, 5, 6, 7, 8, 9, 10, 11].
Circuit diagram for a synthesizer percussion module. It’s a basic ringing oscillator design, using trigger voltage as a pulse generator; it has an interesting adjustable-harmonics feature. It does not appear to be particularly adjustable; there’s no decay envelope or pitch control. Still, nice clear explanation.
This gadget works. It does exactly what I had imagined it would. The finish is a little rougher than I’d hoped for, but the functionality is spot on, and I’ll do a better job on the enclosure next time. It’s a lot of fun! I have it sitting on my music table plugged into the Electribe, and it happily thumps away, making completely plausible and often rather interesting percussion loops.
What to make next? Perhaps the walkie-textie.

A MIDI master sequencer keeps its slave devices synchronized by sending clock messages, 24 times per beat. The slave can use this to measure the current tempo, and might respond by playing some note, or by updating an internal timer used to drive arpeggiators or LFOs. If it is a sequence-oriented device, like a groovebox/drum machine, it will also use these clock messages to update its song pointer – the bar and beat it is currently playing.
The system works reasonably well, but it has one significant flaw: there is no provision for resynchronizing song pointers, and so the clock tends to drift over time. If an error occurs somewhere along the chain, and a clock message gets lost, all downstream devices remain out of alignment until the performance stops and starts again.
In general this is not a big problem. Errors are rare, and are not likely to cause perceptible drift in a 5-minute song. For people doing soundtracks, there’s a separate timecode system that provides absolute position. Further, many people do all their sequencing in software now, which solves the drift problem (and introduces many others, of course!).
My performance style, unfortunately, happens to live right in the sweet spot for this problem. My setup includes four tempo-synced devices, and I play continuously for 60-90 minutes, in a “thru-mixed” style which leaves few natural breaks where I could stop and restart the clock without creating an audible glitch. As a result, I run into synchronization problems in almost every performance. Sometimes I can work it out, but sometimes I just grind myself into a trainwreck.
Flush with success from my rhythm robot project, I’m thinking of building a custom MIDI clock device that will solve this problem for me. I imagine a straightforward black box with a big tempo knob, play/pause and stop buttons, a tap tempo button, and a “synchronize” button. Big LED readouts would advertise the current tempo and bar/beat song pointer. The back panel would have three or four parallel MIDI outs so I could run multiple slave chains, reducing latency.
But how to implement the synchronize button? MIDI does include a “set song pointer” message, but a sequencer is not supposed to send it while a performance is running – you’re supposed to pause first, set the position, then continue. Otherwise, maybe the slave device wouldn’t update itself quickly enough, and it’d miss a clock message! Oh no! … but how, exactly, is this any worse than staying out of sync? And this may have made sense thirty years ago, but I would be surprised if any of my modern gear has any trouble swallowing an extra message every now and then. Perhaps they ignore it, though; in that case, I’ll try sending a very quick pause/position/continue triplet. And if even THAT doesn’t work without causing a glitch, I’ll fall back on the fact that everything I do is aligned to groups of 4/8 bars, and the “synchronize” button will simply wait til the next 8-bar break, then send a “start” message, rolling everyone back to the beginning of the loop.
It should be pretty easy to test this out before I actually build the box. I’ll just rig up an arduino, a midi-out port, and a push button, and have it send clocks at some fixed rate, then see what happens when I send a song-position message.

I went to go ride my bike today, for the first time since the crash. This is the shiny new bike, which I chose specifically because I was tired of having to worry whether the machine would start; tired of having to be ready – at any time – to tinker with the machine until it was ready to go.
It doesn’t start.
Thank you very much, anonymous person who ran the stop sign.
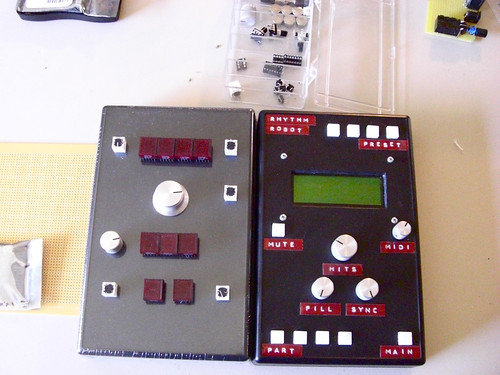
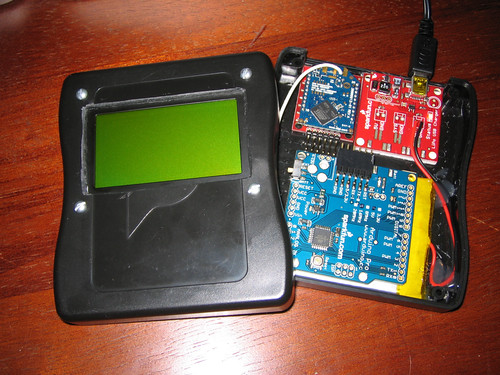
The rhythm robot ought to be finished by now. I spent most of Sunday routing holes and fitting circuit boards, and the result is pretty sweet. I will really have to use a dremel tool next time instead of cutting all the holes by hand with an x-acto knife, though. I will also have to exercise a little more patience next time I try to de-solder the pins on my LCD unit; I ended up mangling the connector edge to the point of stripping copper traces off the PCB, and now the LCD is basically junk. Bummer. I hope to receive the replacement part tomorrow.
In the meantime, it looks pretty cool. I made little embossed labels for all the controls in red tape; it makes a delightfully retro contrast with the black case and silver knobs.
I ordered one of those cute old-school Dymo label embossers, to see if it would be a good way to make captions for the rhythm robot controls. Ava is having entirely too much fun with this device; the phrase “HEY, BABY.” just appeared on my monitor frame.
Git Sucks: a blog post by someone whose experiences with the New Hotness in version-control systems appear to have paralleled mine.
I spent yesterday evening working on the rhythm-robot, and have completed its main control panel. I am really happy to see it coming together. I have a clear image in my head of the instrument I want to play, and it feels good to see steady progress toward it.
Only after powering the board up did I discover I’d misread the datasheet for the PCF8574 port expanders: they’re advertised as having “latched outputs with high current drive capability for directly driving LEDs”, but this only works when you drive the pins LOW (logical false) – the chip can sink current but can’t source it. Of course I’d laid everything out the opposite way, since I want to turn the lights on by setting their pins HIGH (logical true)! Grr. Half a dozen NPN transistors solved the problem, but fitting the new components into the board and splicing them into the logic lines added almost two extra hours to the project.
Hevisaurus is a Finnish metal band whose members are all dinosaurs. They perform totally rocking tunes with a kid-friendly sensibility that is simultaneously adorable and awesome. Go Finland!
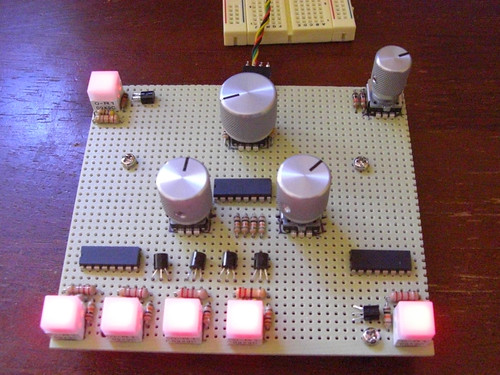
The Digikey order I was waiting for finally arrived, so I spent yesterday evening assembling the front panel for the rhythm-robot. I got three of the encoders and four of the lighted push-buttons wired up to a pair of I/O expander chips; it’s a surprisingly laborious process, as I am using bare perfboard, so I have to cut and solder jumpers for every connection. It’s ok for a prototype, but I’m definitely going to get boards printed if I ever make another one of these.
I crashed my bike yesterday. Yes, the shiny new one. Neither the bike nor I sustained any serious damage, but it was awfully surprising and unpleasant. I was riding west down John Street when a car at the stop sign on 14th pulled out in front of me. I saw the driver look in my direction just before she started moving; I think she simply didn’t notice me. I had just enough time to brake hard, realize I was going to crash, and bail out, without hitting the car. I slid along the road, tearing up my jeans and ripping the heel off my boot, but the safety gear did what it is supposed to do and my skin remained intact.
I came to a stop next to a bus travelling the opposite direction, and people started taking care of me before I had really registered what was going on. Within seconds, the driver called 911, a nurse who happened to be on the bus ran over and started checking me out, a couple of other passengers picked up my bike and rolled it somewhere safe, and two people picked me up by the shoulders and carried me to the curb so I wouldn’t have to put any weight on my leg. The fire department arrived moments later, and determined that I hadn’t broken anything.
The bike is basically fine, though the left-side peg is mangled to uselessness, the left grip is smashed, and both of the turn signals are broken. It has various other cosmetic damage, though the exhaust header, engine, and tank all escaped road rash. Pretty disappointing to have scraped up a bike I just bought… but everything still works, so I guess I came out OK.
I am impatiently awaiting the next batch of parts for my rhythm-robot project. I simply can’t make any progress on the front panel until the switches, LCD panel, and encoders arrive. In the meantime, I’ve decided to sort out and organize my various boxes and drawers full of electronic parts. With Ava’s help, I’ve sorted all of the resistors into one big tackle box with clearly marked slots. Now all the dozens of battery holders have gone into one big box, the transistors are all sorted together, the capacitors have been grouped, I have slots for LEDs, random ICs, switches, potentiometers, and so on. There’s also an entire box of lasers. I still have a table full of parts to be sorted – dozens of linear regulators, a couple of solar cells, half a dozen MintyBoost kits, a stack of EPROMs, various batteries… but the mess is a lot more controlled now, and I’ve filled two wastebaskets with surplus packaging.
I went out for a long motorcycle ride today: a three-ferry loop around the Sound. I rode up to Edmonds, through thick I-5 traffic, and took the ferry across to Kingston. I missed the turn for Port Gamble and rode down to Poulsbo, then back up to the Hood Canal bridge; then it was a nice long foresty shot up the peninsula to Port Townsend.
On the point across from Port Townsend sits Fort Worden State Park, a WWI-era military station with lots of abandoned concrete buildings and old gun batteries. I stretched my legs on a graffiti-covered bunker, then wandered down to the beach and threw rocks at the waves for a while.
The second ferry was a tiny, single-decker affair, the Steilacoom II, running between Port Townsend on the peninsula and Keystone on Whidbey Island. It’s a slow crossing, and it was starting to get a little less sunny out, so I took off riding and did not stop to enjoy Fort Casey, the counterpart to Fort Worden on the east side of the channel.
Motorcyclists get first priority on and off the ferry, so I became part of an impromptu group ride down the length of Whidbey Island as a half dozen of us all seemed to be going in the same direction. It’s a nice country highway ride; there’s only one main road down the island, but it’s relatively open and rural, except for a couple of bottlenecks at Greenbank and Freeland. I can only imagine how jealous the people in the long line of cars at Clinton must have felt, waiting far behind the “90 minutes til ferry” sign, as a stream of motorcycles roared in and cut right to the front of the line. At least they have cushy seats and stereos and a heater and a roof to keep them comfortable while they wait.
Last ferry ride, over to Mukilteo; from here it was a simple ride back to I-5 and then a straight shot home. The new bike, for all its extra displacement, can’t compete with the FJ600 for top speed; I teased it up to 90 mph at one point, but it doesn’t really want to go faster than 80. It starts sounding froggy and acting lurchy, like it isn’t getting enough fuel; I wonder if its carburetor needs some cleaning.
I’ve been soldering up the drum sequencer’s interface board this evening. This board contains all of the back-panel ports: power, the power switch, and MIDI in/out/thru. It consolidates these into the four lines Vcc, GND, TX, and RX, which will drive the microcontroller. This happens to be the same set of lines coming out of the FTDI USB interface; the idea is that I can plug the microcontroller into either the interface board or the USB connector, and it will behave the same way in either case. This should make life easier when debugging the front panel.
The power supply is a simple LM7805-based circuit.
The TLC5940 is a 16-channel LED control chip using PWM with 12-bit resolution. It is controlled via 3-wire serial (weird, neither I2C nor SPI). The chips cost three bucks each.
How to create a distortion effect circuit using op-amps and RC filters. Includes schematics and discussion of power supply biasing.
Mini Space Rockers is a simple percussion synthesizer; the site offers complete circuit diagrams and parts lists.
Pink noise generator using two op-amps, requires +5 and -5v power.
Attack/release envelope generator circuit, designed for +12 volts. Still looking for a zero-attack/immediate-decay envelope circuit… maybe the decay portion of drum trigger circuit will do the trick. There’s also 555 timer based ADSR; I don’t quite understand how it works, but it looks pretty simple and doesn’t need many external components. It wants +/- 15V supply, which is awkward, but perhaps I can make it work on 9V by reducing all those 4.7k resistors.
I certainly didn’t wake up yesterday planning to buy another motorcycle, but when I saw the ad on craigslist I simply had to go take a look.
I enjoy working on bikes, but I can’t stand not being sure the bike is going to start. I’ve gotten really tired of getting my FJ600 running smoothly, thinking everything is fine, going out somewhere, and having to abandon my bike for a couple of days until I can come back with tools. It’s just too stressful. My bike needs to be a reliable form of transportation, not just a mechanical hobby.
So why not just buy a newer bike? Well…. the motorcycle market spent a good 15 years solidly divided between cruisers and sportbikes, and the standard / naked / upright style I like has only come back into vogue in the last 5 or 6 years. The newer bikes I like cost more than I want to spend, and the newer bikes I can afford just… don’t excite me.
The ad, then, grabbed my attention: a 1986 Suzuki VS700, with the engine from a 2003 VS800! Oh my. A classic ’80s standard, just a hint of cruiser style, and a modern engine? A bike I can afford with only 10,000 miles on the powertrain? Too good to be true!
So Ava and I drove up to Lake Stevens, I took it out for a wandering, drizzly test ride, and then I rode it home. It is still a project bike, of course – but at least the work it needs is only cosmetic. The engine starts right up, pulls hard, and idles smoothly. It’s a shaft-drive machine, so there’s no chain maintenance to worry about (huzzah!). Brakes are in good condition, all the electrical systems work, and the tires are nice and fresh. All I need to do is re-upholster the seat and adjust the handlebars / levers etc to fit me.
This leaves me with two bikes I need to sell, of course. The new bike is just as stylish as my old Maxim, so it’s going to be much easier to let go of that machine now; and the FJ600, while cranky, does run and is in pretty decent condition aside from needing a new carburetor, so I think I should be able to sell it pretty easily.
Mars Saxman

2006: January February March April May June July August September October November December
2005: January February March April May June July August September October November December
2004: January February March April May June July August September October November December
Wanderings in Black and Red (previous site)
